The Purpose
We know the stress state () on the horizontal/vertical faces. Mohr’s Circle allows us to find the stress on any inclined plane () graphically, without solving complex rotation equations.
Most importantly, it reveals the Principal Stresses (Max/Min normal stress) and the Maximum Shear Stress.
The Sign Convention
- Normal Stress ():
- Tension (+): Pulling away from the element (Right on the graph).
- Compression (-): Pushing into the element (Left on the graph).
- Shear Stress ():
- Standard Convention:
- Face X: If rotates the element Counter-Clockwise Plot Down (-).
- Face X: If rotates the element Clockwise Plot Up (+).
- Note: The vertical axis is usually (positive down) or (positive up).
- Standard Convention:
Construction Steps
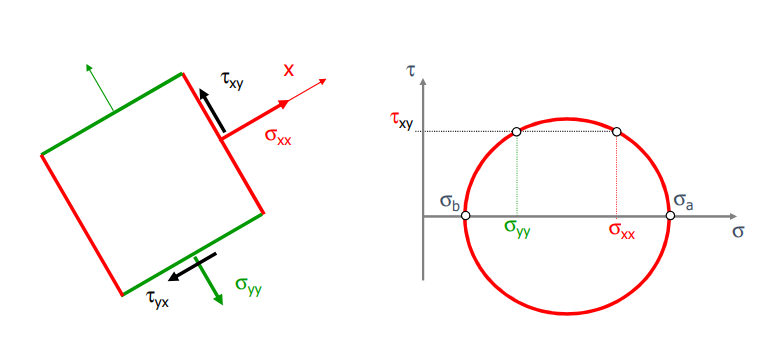
1. Identify the Points:
- Point X (Face X): Plot
- Point Y (Face Y): Plot
- Note: One point will be above the axis, one below.
2. Find the Centre (): The circle lies on the axis (horizontal).
- This is the Average Normal Stress ().
3. Calculate the Radius ():
Distance from Centre to Point X.
Critical Values
Once drawn, the circle reveals the failure points immediately:
1. Principal Stresses (): The points where the circle crosses the horizontal -axis. Shear is Zero here.
- Max Tension/Compression:
2. Maximum Shear Stress (): The highest/lowest point of the circle (top/bottom).
3. Principal Orientation (): The angle on the circle () is double the physical angle ().
- If you rotate on the circle (from Point X to ), you rotate on the real element.
Special Cases
- Uniaxial Tension: Circle touches the origin. .
- Pure Shear: Centre is at origin (). .
- Hydrostatic Pressure: . Radius = 0. The circle is a Dot.
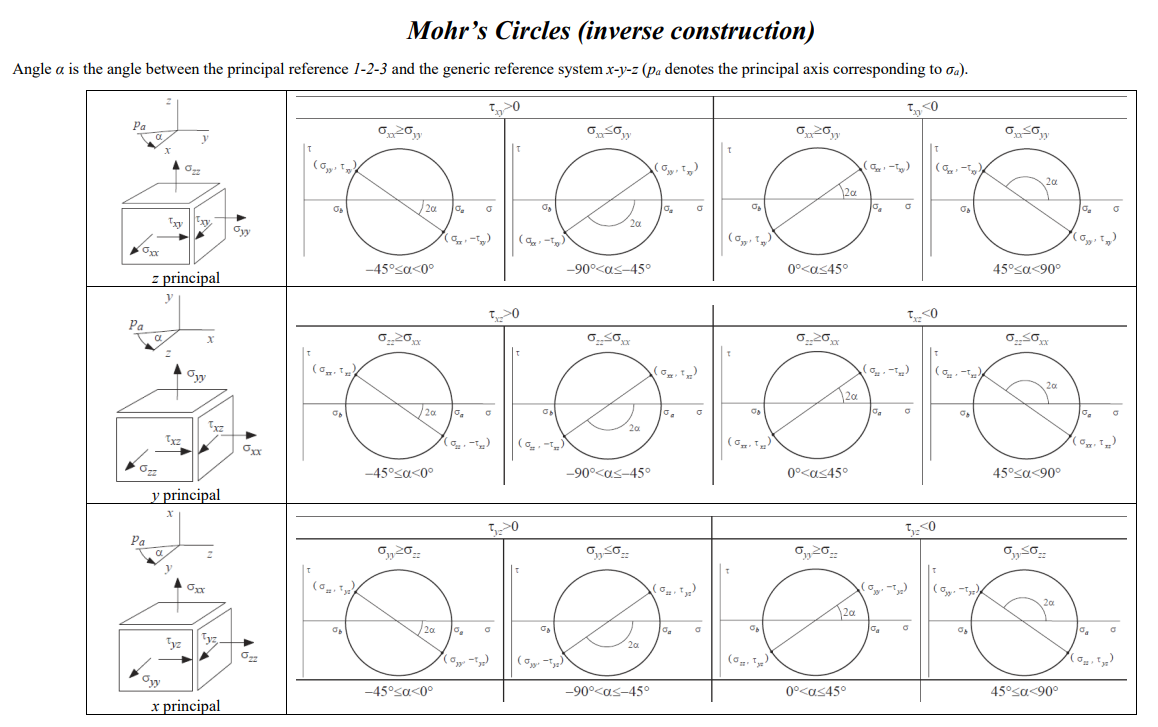
Mohr’s Circle (Inverse Construction)
The Goal
You start with the Principal Stresses () and want to find the normal () and shear () stress on a plane inclined at a specific angle .
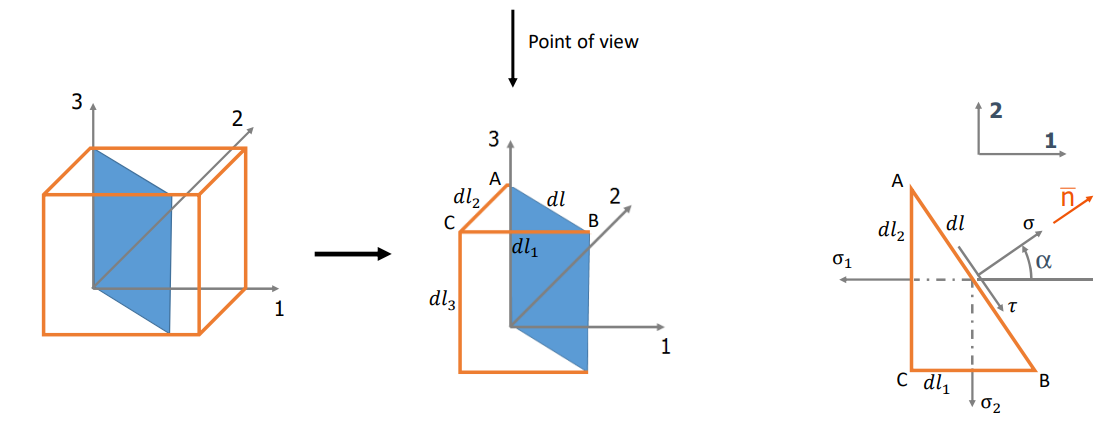
The Setup
1. Plot Principal Stresses
- Mark (Max) and (Min) on the horizontal -axis.
- Note: Shear is zero at these points.
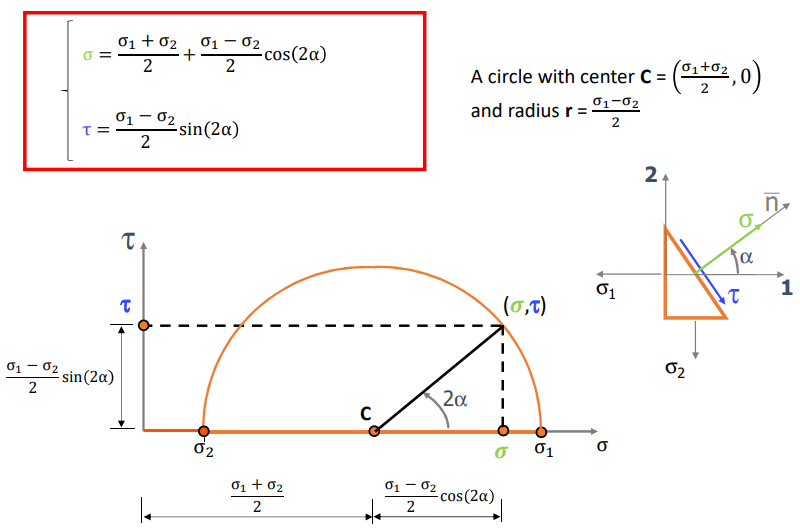
2. Draw the Circle
- Centre (): Midpoint between and .
- Radius (): Distance from to .
- Draw the full circle.
The Rotation Rule ()
The Golden Rule of Mohr
Real World vs. Circle World
- Real Element: Angle is .
- Mohr’s Circle: Angle is .
- Direction: The direction is the SAME.
- If you rotate the cut Counter-Clockwise (CCW) by in reality, you rotate the radius Counter-Clockwise (CCW) by on the circle.
The Procedure
- Start at the Reference Point: Usually Point 1 (), which represents the Principal Plane (where max stress acts).
- Rotate: Measure an angle of from the horizontal axis in the correct direction.
- Find Point P: The end of this new radius is your state .
- Read Values: The coordinates of P are the Normal and Shear stress on that inclined plane.
The “Pole” Method (Origin of Planes)
This is a graphical trick to find the stress on any plane without calculating angles first. It is often faster for complex problems.
1. Find the Pole ()
- Start at a known point on the circle (e.g., the Principal Stress point ).
- Draw a line through that point PARALLEL to the physical face it represents (e.g., since acts on a vertical plane, draw a vertical line through the point).
- Where this line crosses the circle again is the Pole ().
2. Use the Pole
- Draw a line from the Pole () parallel to any physical cut you want to analyse (angle ).
- The point where this line hits the circle gives you the exact for that cut.